TLDR
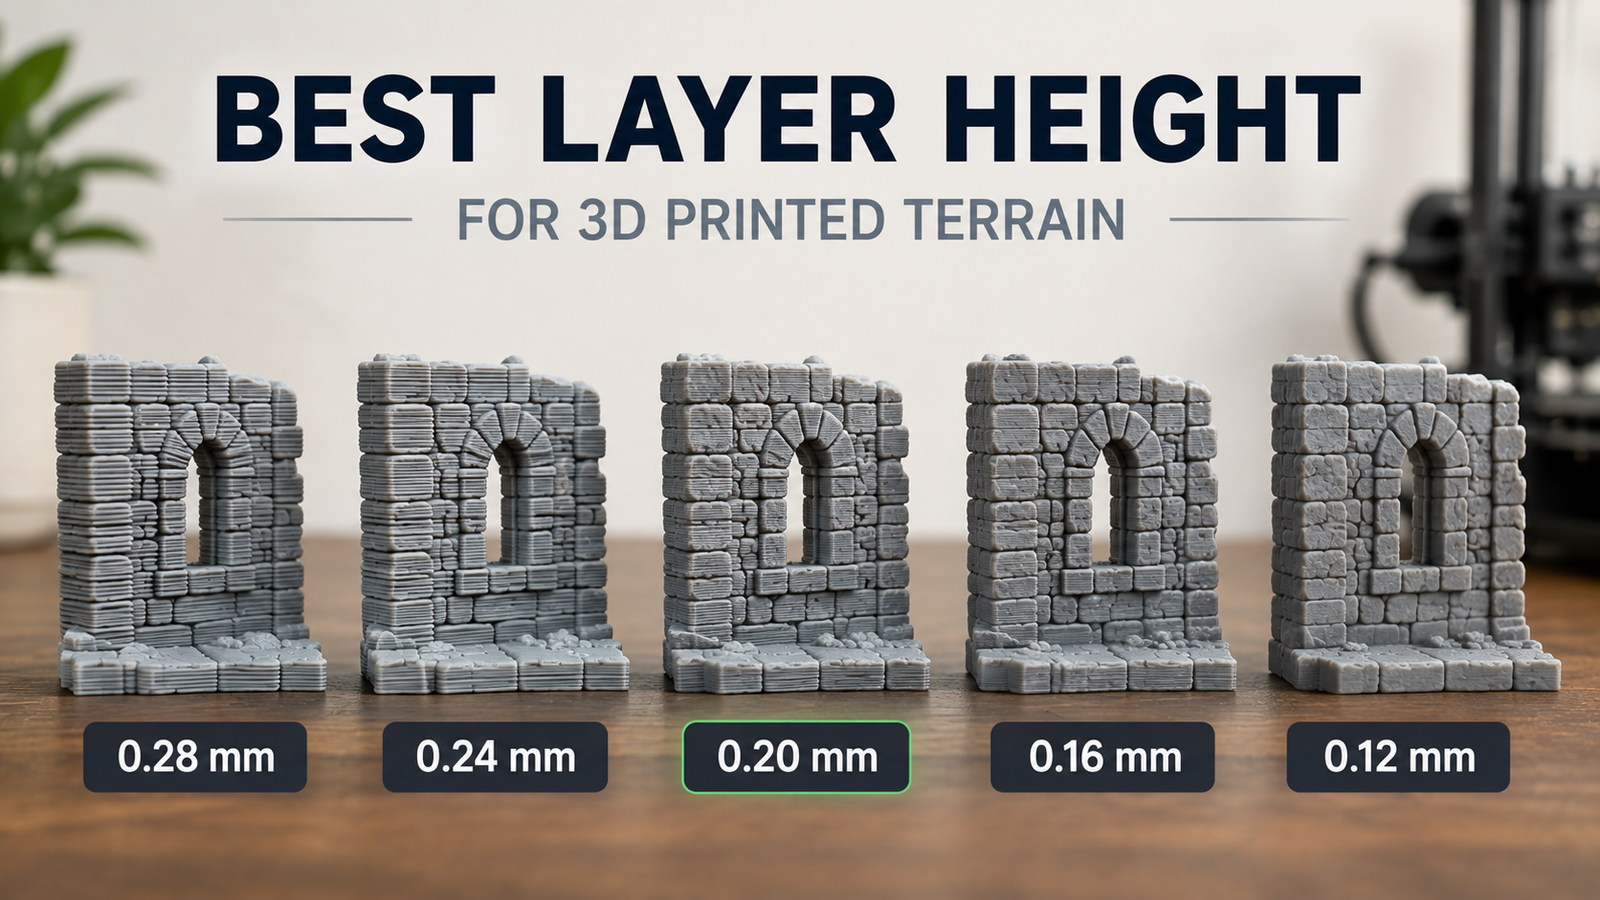
- 0.20 mm is the best general-purpose layer height for most 3D printed terrain using a 0.4 mm nozzle.
- 0.16 mm is a good step up when you want smoother arches, slopes, curved stone, roofs, or other visible geometry.
- 0.12 mm is useful for highly detailed or display-focused terrain, but the longer print time is often unnecessary for basic walls and floors.
- 0.24 mm is a good fast setting for large terrain where small layer lines will not matter much.
- 0.28 mm works for prototypes and large, simple pieces, but curved and angled surfaces become noticeably rougher.
- Layer height does not improve every type of detail. A smaller layer height mainly improves vertical and sloped surfaces.
It’s easy to assume that smaller layers always make better terrain.
Technically, finer layers can improve surface quality. But if you print an entire dungeon at 0.08 or 0.12 mm when the pieces look nearly identical at 0.20 mm from across the gaming table, you may be spending a lot of extra printer time for very little benefit.
For most 3D printed terrain on a 0.4 mm nozzle, 0.20 mm is the setting we would start with.
Then change it only when the model gives you a reason.
What Does Layer Height Actually Change?
Layer height is the thickness of each horizontal layer your FDM printer lays down.
At 0.20 mm, every new layer raises the model by 0.20 mm. At 0.12 mm, the printer needs more layers to reach the same height.
Smaller layers give the printer more opportunities to approximate curves and angled surfaces. This reduces the visible stair-step effect that appears when a curved shape is divided into horizontal slices.
But layer height only affects one part of resolution.
Prusa specifically notes that layer height changes vertical resolution. Nozzle diameter has more influence over how much detail can be reproduced in the XY plane, parallel to the print bed.
That distinction matters a lot for terrain.
A vertical brick wall may gain surprisingly little from dropping from 0.20 mm to 0.12 mm. A rounded arch or gently sloped roof can gain much more.
Our Default: 0.20 mm With a 0.4 mm Nozzle
For general FDM terrain, 0.20 mm is hard to beat.
It provides enough vertical resolution for most:
- dungeon walls
- stone floors
- wooden floors
- building walls
- modular tiles
- battlements
- towers
- stairs
- ruins
- bridges
- cavern pieces
- scatter terrain
At the same time, it avoids dramatically increasing the number of layers required for every wall and building you print.
That balance matters because terrain tends to multiply.
You aren’t normally printing one wall. You may eventually print twenty straight walls, twelve corners, several doors, a staircase, two rooms, a bridge, and half a castle.
Saving time on every piece adds up quickly.
For Printable Realms terrain, 0.20 mm on a 0.4 mm nozzle is the baseline we recommend unless a specific model benefits from something different.
Comparing Common Terrain Layer Heights
| Layer Height | Best Use | Main Tradeoff |
|---|---|---|
| 0.12 mm | Detailed or display terrain | Long print times |
| 0.16 mm | High-quality general terrain | Slower than necessary for simple pieces |
| 0.20 mm | Most tabletop terrain | Best overall balance |
| 0.24 mm | Faster walls, floors, buildings | More visible stepping |
| 0.28 mm | Drafts and large simple pieces | Curves become noticeably rougher |
None of these settings is automatically right or wrong. The shape of the model matters as much as the number in the slicer.
0.12 mm: Fine Detail
A 0.12 mm layer height is useful when surface finish matters more than speed.
It is especially helpful on:
- rounded arches
- curved walls
- statues
- ornamental architecture
- sloping roofs
- organic rock formations
- curved staircases
- decorative columns
- models intended for close-up photography
The additional layers make curved and angled surfaces appear smoother.
But 0.12 mm can be unnecessary on large areas of vertical masonry.
If your model is a simple rectangular dungeon wall with deep stone texture, the visible improvement may be much smaller than the print-time difference suggests.
Use 0.12 mm because the geometry needs it, not because the number sounds better.
0.16 mm: A Good High-Quality Setting
If you want terrain that is a little smoother without going all the way to 0.12 mm, 0.16 mm is an excellent middle ground.
This is a particularly useful setting for pieces that combine straight architecture with some curved geometry.
Think:
- stone archways
- castle windows
- curved dungeon sections
- decorative doors
- tiled roofs
- stairs
- rock faces
- sculpted ruins
You retain much of the practical speed advantage of normal FDM printing while reducing the stepping on visible curves.
If 0.20 mm looks slightly coarse but 0.12 mm feels excessive, try 0.16 mm first.
0.20 mm: The Best All-Purpose Terrain Setting
For most people, this is the answer.
A 0.20 mm layer height on a 0.4 mm nozzle handles the bulk of tabletop terrain very well.
It is detailed enough for strong masonry texture, cracks, wood grain, paving stones, bricks, planks, tiles, and architectural shapes when the model itself is designed with FDM printing in mind.
And good terrain design matters more than chasing tiny layer heights.
A deeply defined stone wall printed at 0.20 mm can look better than a shallow, barely visible stone texture printed at 0.12 mm.
The model has to give the printer enough geometry to work with.
Layer height cannot rescue detail that is too small or too shallow to reproduce through a 0.4 mm nozzle.
0.24 mm: Faster Without Going Full Draft Mode
There are plenty of situations where 0.24 mm makes sense.
Large straight walls are a good example.
If the wall surface is covered in chunky stone, timber, brick, or intentionally rough texture, the extra layer height may barely matter once the piece is primed and painted.
It can also work well for:
- basic floors
- foundations
- structural supports
- simple buildings
- large fortifications
- tall towers
- terrain you need in quantity
The tradeoff becomes easier to see on curved tops, arches, shallow slopes, and smooth surfaces.
So a useful rule is to think about the silhouette.
If most of the model is vertical or horizontal, 0.24 mm may work very well.
If the model contains long curves and slopes, 0.20 or 0.16 mm is usually safer.
0.28 mm: Best for Prototypes and Simple Terrain
A 0.28 mm layer height is getting into draft territory for a 0.4 mm nozzle.
That does not mean the print will be bad.
Large flat terrain can still come out perfectly usable. If you are testing fit, checking scale, prototyping a connector, or printing a huge piece where surface finish isn’t especially important, 0.28 mm can save time.
It also makes sense for pieces where heavy natural texture hides the layers.
But you will see more stepping on:
- arches
- domes
- slopes
- rounded rocks
- curved walls
- angled roof surfaces
Prusa recommends keeping layer height below roughly 80% of nozzle diameter. With a 0.4 mm nozzle, that puts the upper practical limit around 0.32 mm.
So while 0.28 mm is reasonable, you are approaching the upper end of what a 0.4 mm nozzle is typically used for.
Smaller Layers Don’t Improve Every Detail
This is one of the easiest mistakes to make when tuning terrain.
Imagine a stone pattern carved into the top surface of a floor tile.
Reducing the layer height doesn’t necessarily make those stone outlines dramatically sharper because the detail is primarily happening in the XY plane.
The same applies to text printed flat on the bed.
Prusa’s documentation points out that embossed text parallel to the print bed will look essentially the same regardless of layer height. For better XY resolution, nozzle diameter becomes more relevant.
Now rotate that same detail onto a sloped or curved surface.
Layer height matters much more.
This is why the same setting can look fantastic on one terrain model and rough on another.
Curves and Slopes Benefit Most From Fine Layers
If there is one category where dropping layer height makes an obvious difference, it is shallow curves and slopes.
Imagine cutting a circle out of square blocks. The smaller the blocks become, the closer the outline can follow the curve.
Layers work in a similar way vertically.
Finer layers can improve:
- rounded arch tops
- circular towers
- curved walls
- rock formations
- roof slopes
- domes
- pipes
- organic cavern walls
- rounded decorative trim
A vertical castle wall does not have the same problem. Each layer is being stacked almost directly above the previous one.
That is why there is no single “high quality” setting that makes sense for every piece.
Consider Variable Layer Height
There is another option: don’t use the same layer height for the entire model.
Modern slicers can use variable or adaptive layer heights.
A straight section of wall might print with thicker layers, while an arch or curved feature switches to finer layers.
PrusaSlicer, for example, can automatically or manually assign different layer heights to different portions of a model. Prusa notes that this can reduce print time while sacrificing very little surface quality.
This can be particularly useful for terrain because buildings often contain both simple and complicated geometry in the same part.
A tall vertical tower may not need fine layers for most of its height.
Its curved battlements or decorative top might.
Variable layer height lets you spend the extra layers where they actually help.
Layer Height vs Nozzle Size
Layer height and nozzle size are related, but they are not interchangeable.
The nozzle controls the width and size of the extrusion leaving the hotend. Layer height controls how tall each slice of the model is.
A 0.4 mm nozzle remains the most versatile starting point for detailed terrain because it can reproduce relatively fine texture without making large prints painfully slow.
Moving to a larger nozzle can increase throughput, but very small XY details may become harder to reproduce. UltiMaker also notes the general tradeoff between larger nozzles, faster printing, and more visible layers or reduced fine detail.
For a massive castle or terrain board, a larger nozzle may make sense.
For a modular system containing detailed walls, floors, connectors, doors, and architectural details, 0.4 mm is a very useful compromise.
Think About Painting Before Chasing Layer Lines
Terrain usually isn’t finished when it leaves the printer.
It gets primed and painted.
Stone may receive a dark base coat, a wash, and several drybrushed highlights. Wood gets grain picked out. Brick gets mortar and weathering. Cavern walls may intentionally have irregular surface texture.
All of this changes how visible the raw layer lines are.
That does not mean layer height doesn’t matter. A badly stepped curved surface will still be visible.
But there is little reason to spend twice as long chasing a tiny surface improvement that disappears after primer and paint.
Judge the print as terrain, not as an unpainted calibration model held three inches from your face.
A Simple Decision Guide
Start at 0.20 mm.
Then look at the model.
If it is mostly straight walls, floors, or chunky architecture, stay at 0.20 mm.
If it contains prominent arches, curves, angled roofs, or organic surfaces, try 0.16 mm.
If it is a showcase piece with lots of visible curves and fine sculptural geometry, consider 0.12 mm.
If you need a large quantity of simple walls or floors and speed matters, test 0.24 mm.
If you are only checking dimensions, scale, assembly, or fit, 0.28 mm may be all you need.
That approach is much more useful than automatically choosing the finest profile your slicer offers.
FAQs
Is 0.20 mm layer height good for terrain?
Yes. For a 0.4 mm nozzle, 0.20 mm is an excellent starting point for most dungeon tiles, walls, buildings, towers, floors, and general tabletop terrain.
Is 0.12 mm worth it for 3D printed terrain?
Sometimes. It is most useful for curved, sloped, organic, or highly decorative pieces. Straight walls and flat floors often show much less improvement.
Is 0.28 mm too rough for terrain?
Not necessarily. It can work well for prototypes, large structural pieces, heavily textured terrain, and parts where speed matters more than surface finish.
Does a smaller layer height make stone texture sharper?
Only in some directions. Layer height mainly improves vertical resolution. Detail that lies primarily in the XY plane may depend more on nozzle diameter and the size of the modeled features.
What layer height should I use with a 0.4 mm nozzle?
For terrain, start around 0.20 mm. Move toward 0.12 to 0.16 mm for smoother curves and toward 0.24 to 0.28 mm when speed matters more.
Should I use adaptive layer height for terrain?
It can be very useful. Variable layer height allows simple sections to print quickly while giving curves, slopes, and other visible features finer layers.
The Bottom Line
For most 3D printed terrain, use 0.20 mm as your starting point.
It is detailed enough for the textures that matter on the table while remaining practical when you need to print an entire collection rather than a single showcase piece.
Move down to 0.16 or 0.12 mm when the geometry gives you a reason. Move up to 0.24 or 0.28 mm when speed matters and the model is simple enough to handle it.
The goal isn’t to print with the smallest number your machine can manage.
The goal is to use enough resolution that the finished terrain looks good, fits correctly, paints well, and gets onto the table without taking forever to print.
References
- Prusa Knowledge Base, “Layers and Perimeters.”
- Prusa Research, “Everything About Nozzles With a Different Diameter.”
- Prusa Knowledge Base, “Variable Layer Height Function.”
- UltiMaker, Cura print profile and nozzle guidance.