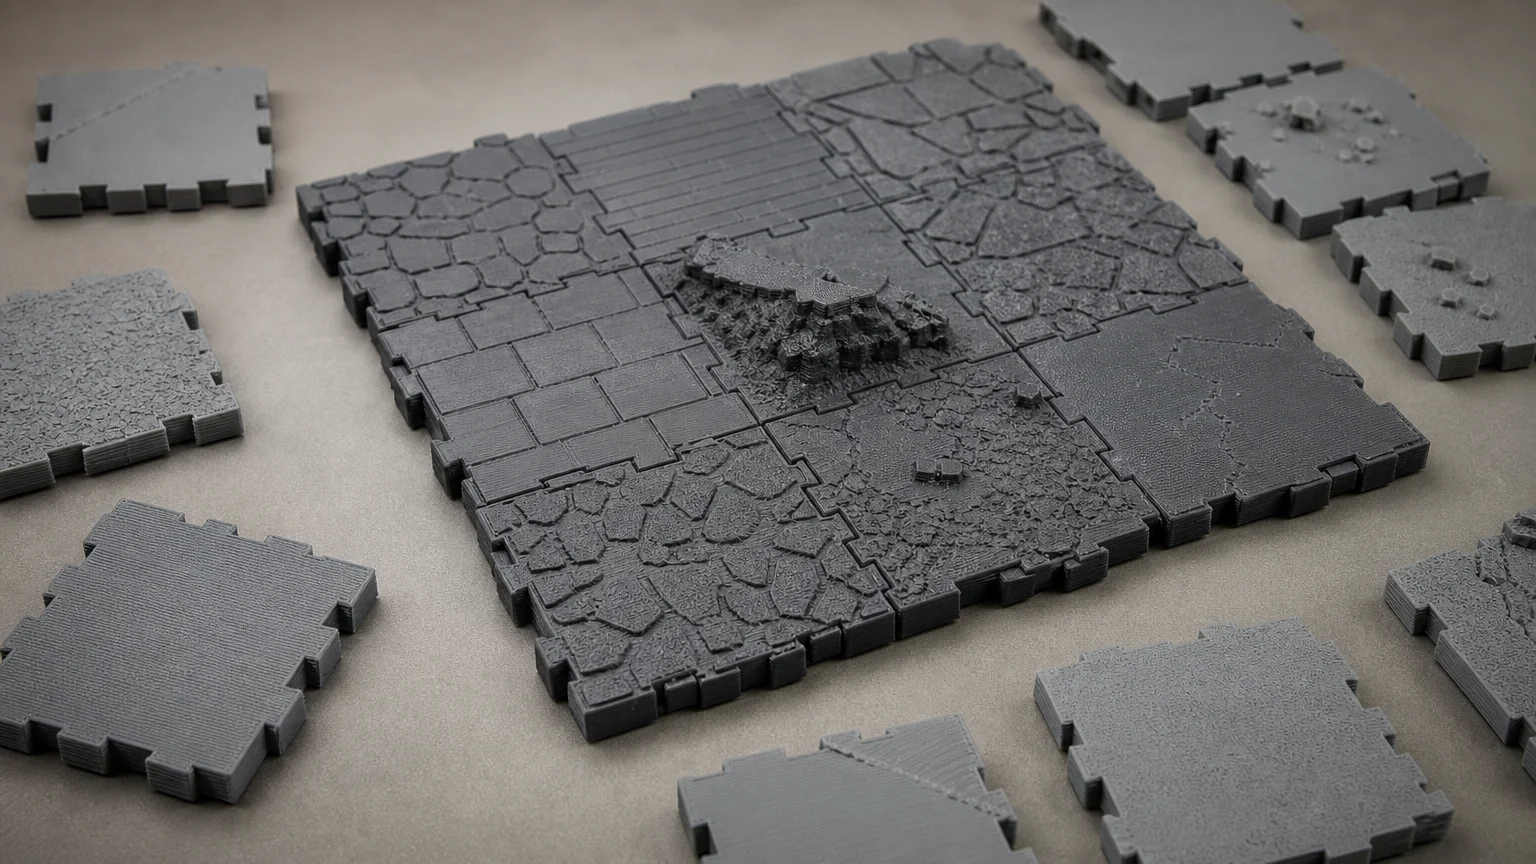
TLDR: For most 3D printed terrain, a relief depth of 0.8 to 1.2 mm provides good readability and shadowing, while 1.5–2.5 mm delivers dramatic texture that stands out at tabletop distance. Nozzle diameter (usually 0.4 mm or larger) sets the minimum width of fine features, and layer height controls how smooth or stepped your relief feels. Deeper relief makes details more readable, easier to paint, and much more visible under gaming lights—especially on terrain floors and vertical walls. Fine textures need at least three layers of Z-height to show up reliably; major relief benefits from exaggerated depth.
What makes a dungeon floor feel real isn’t just the surface pattern but how deep stones, cracks, and details actually pop out from the base. The 3D printed terrain texture depth you choose affects everything from how your models catch the light, to how paint settles, to whether tokens slide or miniatures wobble. This guide explains how relief depth, printer mechanics, playability, and visual payoff all work together—and what to consider for floors, walls, and different styles of terrain build.
Why Relief Depth Matters in 3D Printed Terrain
Relief depth is the vertical distance that a textured feature rises or sinks from the neutral surface of your terrain piece. In FDM 3D printing, this is usually measured in millimeters. Texture depth does a lot of heavy lifting for readability—especially in a tabletop setting, where terrain is seen from above, under variable lighting, and often from a few feet away. Shallow details can disappear into plastic sheen or get lost after painting, while pronounced texture creates shadows, definition, and a tactile sense of material.
Shadows naturally form in recessed areas, making textures look more dramatic and helping paint techniques such as drybrushing and washes show off every crack and edge. On gaming terrain, deeper relief not only aids visual legibility but also disguises the visible layering that comes from FDM printing, especially when using coarse layer heights for faster prints .
Relief, Printer Mechanics, and Why Depth Isn’t Just Visual
Your printer’s mechanical limits shape how much texture you can reliably reproduce. The nozzle diameter—most often 0.4 mm—defines the thinnest wall or ridge you can form horizontally (in the XY plane). Anything smaller may either not print or be fragile . Vertically (the Z direction), your chosen layer height (typically 0.1–0.3 mm for terrain) alters both the smallest vertical step you can create and how smooth or blocky the relief appears.
- Nozzle diameter sets the minimum width of raised or recessed features: 0.3 mm is often the thinnest reliable line with a 0.4 mm nozzle .
- Layer height sets your Z-axis resolution: details must be at least 2–3 layers thick to reproduce well.
- Deeper relief means more layers, which improves step definition and makes features visually stand out .
Embossed details—like stones, bricks, or even text—are easiest to see when their relief is at least three times the layer height. For most prints, this means features should rise or sink by 0.8–1.2 mm at minimum .
Visual Effects: Shadows, Paint, and Tabletop Readability
Relief depth brings out shadows and sharp transitions, which is critical for terrain meant to read well from arm’s length—think dungeons, flagstone floors, stone walls, or cliff faces. When relief is too shallow, everything blends together, especially under gloss or after painting. Deeper relief exaggerates the shape and encourages shadows to form even under flat light—a trick that makes painted washes and drybrushing more effective .
This is why sculptors and terrain designers frequently exaggerate depth compared to what real stone or wood would look like in the real world. A 1 mm groove may seem huge at model scale but reads as a fine crack or joint from the perspective of RPG figures and human eyes at the table.
Terrain Floors vs. Walls: Different Depths, Different Demands
Not all texture needs are equal. Floors are usually viewed from above and must stay flat enough for miniatures and tokens to rest securely, so their texture should be pronounced, but not so deep that bases wobble or sliding is awkward. A relief of 0.8–1.2 mm is typically enough for most stone floors or dungeon tiles to read well without interfering with play .
Walls, on the other hand, are meant to be visually dramatic, often standing vertically or at the edge of the play area. Here, more exaggerated relief—up to 2.5 mm or more—creates visually distinct brickwork or stones that players can see from across the table. Walls are less likely to interfere with figure placement, so going bolder with depth pays off . More extreme terrain, like rocks or cliffs, often benefits from even deeper relief or z-exaggeration for maximum impact .
Fine Texture vs. Major Relief: Guidelines for Each
Fine texture covers subtle surface details—wood grain, small cracks, or the stipple of stone—which may only protrude by 0.3–0.5 mm. With coarser layer heights or large nozzles, these can blend away, so designs should exaggerate even minor features. When relief is too subtle, they can vanish under primer or after painting washes fill recesses.
Major relief addresses bigger changes—ridges, stones, bricks, grout lines, tiles—that rise a full millimeter or more above the base. For maximum reliability, aim for at least 0.8–1.2 mm for most features, and push 1.5–2.5 mm for visually dramatic elements. For especially flat source models, some designers scale up relief (Z-exaggeration) by 150% or more for better shadowing .
Printer Settings That Support Visible Relief
| Setting | Purpose | Recommended for Terrain |
|---|---|---|
| Nozzle Size | Defines minimum horizontal feature width | 0.4–0.6 mm |
| Layer Height | Controls Z-resolution and speed | 0.20–0.30 mm |
| Wall/Perimeter Count | Makes relief edges sharper | 2–3 for most tiles |
| Print Orientation | Alters step definition and strength | Floor: flat; Wall: vertical, if possible |
| Relief Depth | Determines visible shadow and detail | 0.8–2.5 mm |
Coarse print settings speed up terrain printing and let relief hide visible layers. This is one reason terrain designers often recommend layer heights up to 0.28–0.3 mm and larger nozzles without loss of visual quality after painting . For deep texture, don't be afraid to maximize relief within the design's limits.
For more on optimizing printer settings for terrain, check out Best 3D Printer Settings for Tabletop Terrain: Layer Height, Infill, Walls, Supports & Nozzle Size. You can explore nozzle choices and detailed layer height advice at What Nozzle Size Is Best for 3D Printed Terrain? and What Is the Best Layer Height for 3D Printed Terrain?.
Playability: Relief and the Function of Terrain
While deep relief adds visual pop, it can affect practical use. Floors with very high texture may make miniatures wobble or cause tokens to slide. Generally, relief above 1.2 mm should be considered carefully for floors—walls and cliffs don’t have the same concerns. Well-balanced exaggeration improves playability by making features apparent (such as stairs or pits) but shouldn’t create hazards for bases or block modular stacking.
Modular tiles and terrain that must fit together should keep extreme relief away from connection points and grid lines, ensuring that terrain remains stable during active play. For more on matching physical dimensions to tabletop needs, see How Tall Should 3D Printed Dungeon Walls Be?.
Expert Recommendations and Print Settings
There is no one-size-fits-all rule, but expert sources converge on some broad guidelines:
- Fine texture: At least 2–3 times your chosen layer height (often 0.6–1 mm for best results).
- Major relief: 1–2 mm for typical brickwork or stones; up to 2.5 mm (or more) for dramatic cliffs and architectural accents .
- Nozzle: Prefer 0.4–0.6 mm for terrain—smaller nozzles may capture more nuance but slow printing considerably .
- Layer height: 0.20–0.30 mm strikes a good balance for most terrain, letting pronounced relief rise quickly without excessive print times .
- Z-exaggeration (vertical scale-up): Useful when the original model relief is below 1 mm; consider scaling Z axis by 150% to achieve better visual impact .
Considerations and Open Questions
The ideal relief depth depends on your terrain’s purpose, visual style, and printing priorities. There are open questions about the minimum relief needed to avoid play issues with sliding tokens or wobbling pieces—most sources are expert recommendations, not strict measurements. Different games, scales, and visual aesthetics will demand their own balance. Post-processing (such as priming or painting techniques) may exaggerate or mute relief, so it pays to test if in doubt.
FAQs
- What is the minimum depth for visible relief on printed terrain? A relief of around 0.8–1.2 mm is generally required for clear readability at tabletop distance. Finer details may be lost unless exaggerated beyond what might seem realistic .
- How deep can texture be before it interferes with play? For floors, relief above 1.5 mm risks miniatures wobbling—walls and cliffs can handle more dramatic relief since they aren’t pieces you place models on.
- Does deeper relief slow down prints? Deeper relief usually means additional print time, but faster layer heights (0.28–0.3 mm) can offset this without significant loss of visible detail on terrain .
- Can I use a larger nozzle for terrain with deep relief? Yes. Larger nozzles (0.5–0.6 mm) print faster and the increased extrusion helps texture look even more pronounced. Fine lines under 0.3 mm can be lost, but most terrain does not require micro-detail .
- Is Z-exaggeration (vertical scaling) necessary? It’s helpful when working from source models with minimal relief—scaling the Z axis ensures details are not lost to flattening during slicing or in final print appearance .
Conclusion: Finding the Sweet Spot for Relief Depth
Relief depth is one of the key factors in making 3D printed terrain that both looks and plays great. For most printable floors and walls, aim for at least 0.8 mm of depth for visible texture, 1.5–2.5 mm for bold features, and adjust for your table’s needs. Be aware of printer constraints (especially nozzle and layer height), and don’t hesitate to exaggerate relief for visual impact. When in doubt, do a test print and see how your lighting, painting, and play habits bring out the best in your terrain. For further detail-driven advice, see guides like What Is the Best Layer Height for 3D Printed Terrain? and How Tall Should 3D Printed Dungeon Walls Be?.
References
- Painting to 3D-Printed Relief — depth maps, heightfields and lithophanes
- Terrain Model Layer Height: Fix Flat-Looking 3D Prints | MeshQuad Topo
- TouchTerrain—3D Printable Terrain Models
- Add Custom Text Labels to 3D Terrain Models (No Print Fails) | MeshQuad Topo
- How to print maps, terrains and landscapes on a 3D printer – Original Prusa 3D Printers
- Wargaming Terrain Print Settings for Speed
- 3D Printing Tabletop Terrain on FDM: Complete Guide