
TLDR
Choose magnets when fast setup, easy reconfiguration, and clean-looking edges matter most. Choose clips when you want mechanically constrained alignment, predictable compatibility, and stronger resistance to pieces separating during handling. Magnets are convenient, but their real holding power depends on contact gaps, orientation, placement, and the direction of the load. Clips require more deliberate assembly and carefully tuned tolerances, but they do not introduce polarity mistakes or loose-magnet hazards.
For most permanent dungeon collections, clips are the simpler baseline. Magnets become especially attractive for frequently rearranged rooms, walls, roofs, and scenic sections that mostly need to stay aligned on the table rather than survive being lifted as one structure. A hybrid system can also work: clips at important structural joints and magnets where rapid access or reconfiguration matters.
Magnets and clips solve different connection problems
The magnetic terrain connectors vs clips decision is not just about which attachment feels more satisfying. It determines how pieces align, how quickly a layout changes, how much post-processing every tile needs, and what happens when someone bumps the table.
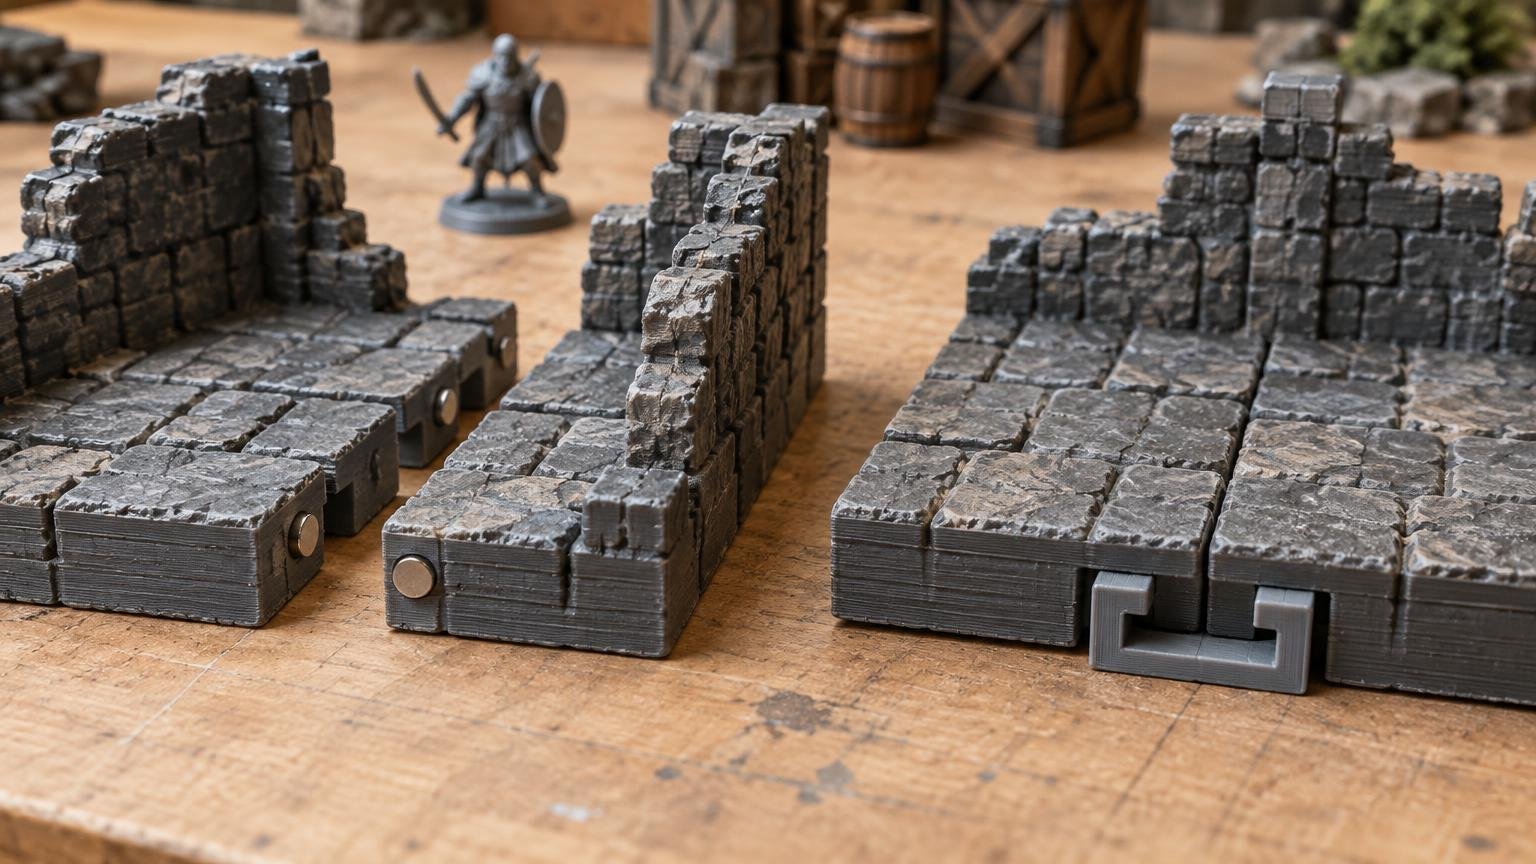
A mechanical clip connects terrain by engaging printed features such as slots, sockets, rails, or under-floor channels. The geometry controls the final position. If the clip and receiver fit correctly, the connection resists both separation and sideways movement.
A magnetic connector uses attraction to draw two interfaces together. That attraction can come from paired magnets or from a magnet facing a suitable steel target. The resulting joint is quick to engage, but it is not automatically rigid. Its performance depends on magnet geometry, the finished gap between surfaces, part weight, and whether the load pulls the pieces apart or slides them sideways.
Hybrid terrain is possible as well. Terrain Tinker has documented designs with magnetic holes offered alongside OpenLOCK-style clip positions, illustrating how one terrain workflow can support both approaches. That does not make the two systems interchangeable, but it shows that a collection does not always require one connector philosophy everywhere.
Quick comparison
| Factor | Magnets | Clips |
|---|---|---|
| Setup speed | Fast engagement and easy rearrangement | Slower because each joint must be inserted or engaged |
| Alignment | Paired magnets can pull toward center, but positioning depends on pocket geometry | Connector geometry can positively constrain position |
| Resistance to sideways bumps | Varies considerably with gap, placement, and load direction | Usually controlled by the mechanical shape of the joint |
| Up-front work | Magnets must be sourced, oriented, installed, and secured | Clips and receivers must be printed and tolerance-tested |
| Ongoing cost | Additional hardware and adhesive may be required | Primarily printed parts, replacement clips, and printer time |
| Failure modes | Weak gaps, reversed polarity, detached magnets, chipped magnets | Loose fit, excessive fit, broken clips, worn receiver edges |
| Best use | Fast-changing layouts and removable sections | Repeatable grids and assemblies that need mechanical retention |
Setup speed: magnets win at the table
Magnets usually provide the fastest setup workflow. Bring compatible edges together and the pieces engage without reaching under the floor to insert a clip. That is valuable when building a dungeon during play, changing a room after a secret door opens, or removing a roof to reach miniatures.
They are also forgiving when you want to separate one section without dismantling every surrounding joint. A wall can lift away, a room can open, or two scenic modules can be pulled apart with relatively little manipulation. This is especially useful around tall walls where fingers cannot easily reach a hidden connector.
Clips take longer because each connection is a small assembly task. The difference becomes noticeable across a large grid. A clip system may also require access to the underside or edge of a tile, depending on its geometry.
That slower engagement buys control. Once a properly fitted clip enters its receiver, the printed geometry can define spacing and resist sideways movement. For a room that will remain assembled through an entire session, the extra setup time may be worthwhile.
Alignment: clips constrain, magnets attract
Clips can control several movements at once. A keyed clip can set the gap between tiles, resist rotation, and prevent one floor from sliding past another. This is useful for gridded terrain, where a small offset can turn a clean corridor into a visibly broken pattern.
The tradeoff is tolerance sensitivity. A receiver printed too tightly can make assembly frustrating or place stress on thin walls. Printed too loosely, it may allow wobble or release the clip whenever the board moves. Material, first-layer spread, extrusion calibration, layer orientation, and wear all affect the fit.
Magnets behave differently. Paired magnets tend to pull toward centered alignment, while a magnet facing steel does not center in exactly the same way and can tolerate more positional offset. Paired magnets can also repel when their orientation is incompatible. K&J Magnetics’ comparison of magnets and steel explains these differences in alignment and holding behavior.
A magnet should therefore not be asked to define precise tile placement by itself. Let the printed model handle alignment with lips, shallow recesses, corner stops, pins, or broad mating faces. The magnets can then provide retention while the geometry prevents drift.
This division of labor is particularly important for stacked terrain. A magnetic wall may stay against a floor during normal play, but a printed ledge or locating feature is better suited to carrying vertical weight and preventing the wall from skating sideways.
Holding force is not the same as tabletop stability
Published magnet pull-force figures are measured under particular test conditions. Surface irregularities, coatings, thin steel, incomplete contact, and gaps can all reduce the force available in a finished terrain joint. Even paint, adhesive, or a magnet sitting slightly below the pocket can create a consequential gap. K&J Magnetics’ strength-testing explanation describes why real assemblies can perform differently from an ideal pull test.
Load direction matters too. Pull force describes resistance along the attraction axis; it does not directly describe resistance to sideways sliding. In K&J Magnetics’ small-gap tests, shear force varied from roughly 40% to 75% of axial attraction for the tested configurations, with about 50% offered as a conservative estimate.
That distinction explains why two magnetized tiles may resist being pulled directly apart but still shift when a hand, sleeve, or dice tray pushes across the board. Texture on the underside, a nonslip mat, perimeter features, and printed alignment geometry may improve practical stability more effectively than simply chasing a larger advertised pull-force number.
Do not assume a connected magnetic room can be lifted as one rigid unit. Whether that works depends on the number, size, grade, and placement of the magnets; the mass of the parts; the interface gap; and the direction in which the assembly is loaded. Test lifting separately from normal tabletop use, and support large assemblies from underneath.
Cost: compare the whole collection, not one connector
A printed clip consumes filament and machine time, but its direct material cost is usually folded into the terrain-printing workflow. If a clip breaks or disappears, another can be printed. The larger cost is development time: receivers and clips need to be tuned so they connect reliably across the printers and materials used for the collection.
Magnets add purchased hardware to every compatible edge or connection point. They may also require adhesive, steel targets, installation tools, and extra assembly time. A small per-joint expense can become significant when multiplied across floors, walls, doors, roofs, and elevation pieces.
Count connection points before committing. A test room might make magnetization seem inexpensive, while a complete dungeon can contain many repeated interfaces. Conversely, magnets may still be economical when installed only at high-value access points, such as removable roofs or wall sections that are changed during play.
The practical cost comparison should include:
- Hardware or filament required for every connection
- Time spent printing clips or installing magnets
- Failed parts caused by poor fit, reversed polarity, or misplaced hardware
- Replacement difficulty after terrain has been assembled and painted
- Whether every edge needs a connector or only selected structural points
- Storage needs for loose clips and spare hardware
When planning a larger collection, start with the rooms and encounter types you actually use rather than multiplying connectors across dozens of speculative pieces. The same restrained approach helps when deciding how to build a terrain collection without printing too much.
Installation and repeatability
A clip system should begin with a small tolerance test containing the real receiver and clip geometry. Inspect whether the clip seats fully, whether insertion flexes or cracks surrounding features, and whether repeated removal loosens the fit. Test pieces printed near different areas of the bed if dimensional consistency is a concern.
Printable Realms describes its terrain around shared dimensions and connection standards while noting that compatibility still depends on the interface used by a particular component. It recommends testing a small assembly before expanding a build. Its free Terrain Starter Pack provides a clip-together layout and includes a Universal connector clip, making it a practical example of a clip-based starting point.
A magnetic system needs a comparable test coupon. Print two representative edges, install the exact hardware and adhesive being considered, then finish them as the real terrain will be finished. Primer and paint matter because even a small separation between magnetic faces can reduce attraction.
For paired magnets, establish one polarity convention before installing anything. Use a physical installation jig or a marked reference magnet rather than trusting memory. Permanent magnets have at least two poles, so reversing one component can turn an intended connection into repulsion.
After curing, test the joint in the ways it will actually be used: pull it apart, push it sideways, rotate it, place a miniature near the edge, and move the assembled section across the table. The goal is not maximum force. It is enough retention for play without making disassembly awkward or damaging painted surfaces.
Durability and repair
Clips concentrate stress in predictable printed features. Thin spring arms can snap, while overly rigid clips can transfer force into the terrain receiver. Favor replaceable clips and receivers with enough surrounding material to survive repeated handling. Layer orientation also matters when a clip bends across layer lines.
Magnets avoid flexible printed arms but introduce their own vulnerabilities. Neodymium magnets are brittle and can chip or crack. Their coatings help protect the underlying material from corrosion, and machining them is not recommended. A magnet pocket should protect the hardware from direct impacts without burying it so deeply that the resulting gap undermines holding force.
Think about repair before sealing a floor. A removable plug or accessible pocket can make replacement possible. A deeply enclosed magnet may produce a cleaner model, but a failed adhesive joint can become difficult to fix after painting.
Magnet safety belongs in the design decision
Loose high-powered magnets present a serious ingestion hazard. The U.S. Consumer Product Safety Commission warns that swallowing two or more can cause severe internal injuries and may require surgery; suspected ingestion requires immediate medical attention. The CPSC magnet safety guidance should be reviewed anywhere children may access the terrain or hobby workspace.
Do not treat a shallow friction-fit pocket as sufficient containment. Secure magnets appropriately, inspect magnetized terrain for loose hardware, and store spare magnets where children cannot reach them. If the gaming environment makes reliable containment doubtful, clips are the safer connector choice.
When a hybrid system makes sense
A hybrid design can use each connector for the job it handles best. Clips can lock the primary floor grid while magnets retain removable walls, door inserts, roof panels, or encounter-specific accessories. This avoids paying for and installing magnets along every tile edge while keeping the parts that players frequently remove fast to operate.
Keep the interfaces distinct and understandable. A hybrid collection becomes frustrating when visually identical edges conceal incompatible clips, magnet polarity, and magnet-to-steel connections. Use keyed geometry, underside symbols, or different pocket shapes so the correct relationship is apparent before pieces reach the table.
If you are designing an entire dungeon rather than one room, map connector locations alongside floors, walls, doors, stairs, and elevation changes. The broader workflow in this guide to building a modular 3D-printed dungeon can help keep the connector decision tied to the playable layout.
The practical verdict
Use clips for a dependable, repeatable terrain grid where accurate spacing and mechanical retention are more important than rapid changes. Use magnets for removable sections and layouts that are repeatedly rearranged during play. Neither connector fixes poor interface geometry: clips need correct tolerances, and magnets still benefit from printed locating features.
Before scaling up, build one representative corner containing a floor, wall, and any elevation feature. Finish it with the intended primer and paint, connect it repeatedly, bump it sideways, and try the exact setup and storage motions the collection will face. The connector that survives that small workflow with the least friction is more valuable than the one that looks strongest in isolation.
Frequently asked questions
Are magnets stronger than printed terrain clips?
Not in a universal sense. A magnet may provide strong direct attraction but much less resistance to sideways movement, especially when a gap exists. A clip can mechanically resist several directions at once, although its performance depends on geometry, material, print orientation, and fit.
Can magnetic terrain be lifted as one assembled room?
Possibly, but it should not be assumed. Part mass, magnet placement, contact gaps, and load direction determine whether joints remain connected. Support large assemblies from below until that exact finished configuration has been tested.
Do I need magnets on every terrain edge?
Usually not. Selective placement can retain the edges most likely to move while reducing hardware cost and installation work. Removable roofs, walls, door inserts, and major room boundaries are stronger candidates than edges that rarely separate.
Should magnets replace alignment pins or lips?
No. Magnets provide attraction, while printed pins, lips, recesses, and stops provide more predictable geometric alignment. Combining retention with locating geometry generally produces a more stable tabletop interface.
References
- New features now live! Magnetic Clipping, Drag Select and more – Terrain Tinker Blog
- Magnets vs. Steel | K&J Magnetics Blog
- Testing Magnet Strength | K&J Magnetics Blog
- Magnet FAQ | K&J Magnetics
- Magnet Shear Force with Doors | K&J Magnetics Blog
- Printable Realms – printablerealms.com
- Printable Realms Terrain Starter Pack – printablerealms.com
- Neodymium Magnet Info | K&J Magnetics
- Magnets | CPSC.gov